


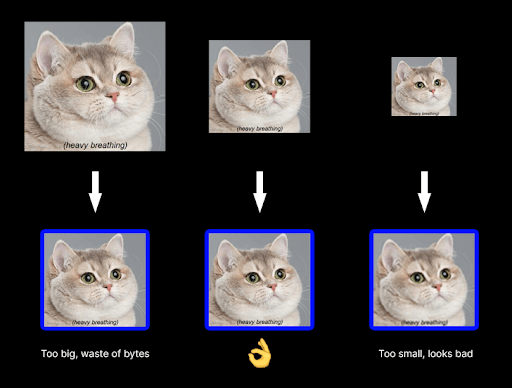
Responsive photos are utilized in just about each web-facing software The Software program Home groups create and publicly launch. Used to optimize the functions’ pace, responsive photos enhance the consumer expertise throughout the Web. Moreover, we enhance search engine marketing and enhance consumer conversions. So, if performed appropriately, responsive photos have a optimistic affect not solely on the app’s consumer satisfaction but in addition on the proprietor’s enterprise.
I’ve all the time felt that responsive photos are usually not sufficiently explored wherever. I’ve studied varied theoretical guides, and all I received was a sense that they wished me to develop the mandatory values and remedy any issues myself. Normally with a bit of recommendation – Gatsby or Subsequent will do it for me, so why even hassle with responsive photos? Sure, this fashion you’ll obtain some optimization, however “some” just isn’t ok for me. If you wish to squeeze the whole lot from a efficiency standpoint, then it’s good to perceive what must be performed and why.
On this article, you’ll be taught:
- the way to optimize your web site with responsive graphics,
- what dimension of photos must you share in your web site,
- the way to check responsive graphics, and what error margins Lighthouse permits.
Not your outdated similar picture. Responsive photos idea
In case you’re new to this, the responsive picture approach permits the browser to load an applicable file dimension relying on the width of the consumer’s display screen displaying your web site. The browser downloads the optimum file for his or her system, i.e. not too massive (saving megabytes), and never too small (dropping high quality on stretched and blurry show). Within the splendid situation, when the system desires to show an X by Y picture, then your Chrome, Firefox, or Safari ought to obtain graphics in X by Y decision.
Why must you care? The Web is quick, and cell units are highly effective sufficient to course of bigger graphics, proper?
Effectively, no.
Drawback-free cell web connection is a privilege for European customers. The remainder of the world sadly offers with connectivity and repair vary issues. Even in The USA, the birthplace of the online as we all know it, discovering high-speed web exterior town will be fairly a problem.
Google is aware of this. When creating its web site index, they have in mind how briskly a web site is working. Websites that require fewer bytes to obtain seem increased within the search outcomes. Google desires Web customers to search out web sites that load effectively and due to this fact are extra nice to make use of.
You’ll be able to’t assume that your app shall be tremendous as a result of it masses easily on a broadband connection.
Google, performing its check for cell units, slows down the connection to 4G (100 Mb/s) to correspond to actual situations. You’ll be able to simulate such a check utilizing the PageSpeed Insights web site. You’ll shortly uncover that because of the elevated necessities, the efficiency ranking is all the time worse on the cell than on the desktop model.
Deep dive into responsive photos
We all know that the img tag shows photos. It has the usual src attribute that factors to the picture file location and incorporates one tackle at most. Don’t give it up and go away it because the default choice – in case somebody runs your web site in an software with out responsive picture assist, e.g. a PDF generator.
To level the browser to different graphics that ought to be displayed relying on the decision of the system, it’s good to use one or two further attributes.
The primary is srcset which defines a set of photos in numerous sizes. Within the primary model, every entry incorporates the tackle of the file and the scale of the picture, and subsequent entries are separated by a comma.
The variety of picture variations and their particular sizes rely upon the applying you’re employed on. I’ve some tricks to comply with, and I’ll talk about them later within the article.
Not all pixels are the identical
The picture dimension makes use of the “w” unit (for width) and specifies the bodily width of the graphic in pixels as it’s saved within the file. This so-called width descriptor is an uncommon unit, not discovered wherever else – so why wasn’t the normal measurement in pixels (“px”) used?
Pixels, as we all know them from CSS, are a relative unit relying on the display screen we use. I’ll use iPhone 13 for instance. Within the portrait place, every row of its matrix consists of 1170 mild factors (i.e. bodily pixels). Nonetheless, had been you to examine the width of the browser display screen utilizing JavaScript, you’d get solely 390 pixels, so thrice much less! This distinction? The latter end result consists of digital pixels, not bodily pixels – measured with the px unit that we use in CSS and JS.
It seems that browsers, every time potential, use a couple of bodily pixel to show a single digital pixel of an internet software. This ratio is known as pixel density, and the extra bodily pixels there are in a digital pixel, the nicer issues look on the display screen.
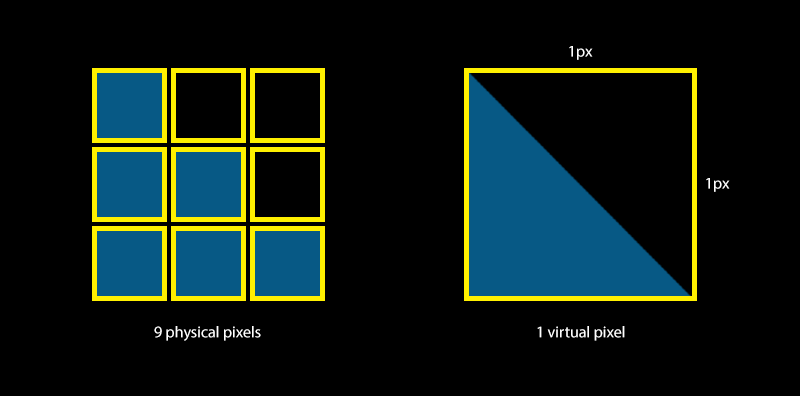
This doesn’t imply that browsers are unable to make use of the complete potential of screens with excessive pixel density. Quite the opposite, identical to taking part in motion pictures in our favourite streaming app, browsers attempt to use each bodily pixel to show as a lot element of the loaded graphics as potential. Subsequently, to point out sharp photos, it’s good to load sufficiently massive information.
The formulation for that is easy:
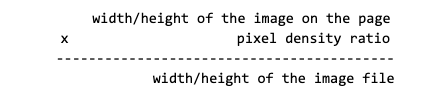
In line with this formulation, if the CSS defines the picture dimension as 300 x 200 px, and the pixel density ratio (DPR) of a given system is 2, then graphics with dimensions of 600 by 400 pixels will look the very best on show (the browser will successfully use each bodily pixel of the display screen).
Nonetheless, you mustn’t fall into the psychological entice that increased pixel densities are reserved for cell units. Screens with an elevated variety of pixels per inch are additionally accessible for desktop computer systems and laptops (e.g. MacBook Retina). There are additionally matrices with a pixel density that isn’t an integer (e.g. Samsung Galaxies boasting a 2.625 coefficient).

As you’ll be able to see, the time period “pixel” will be very deceptive within the context of graphics. Keep in mind, you’ll be able to all the time examine the DPR of your system programmatically by calling window.devicePixelRatio in your script or within the browser’s console.
srcset attribute
Let’s return to our mysterious “w” unit.
The creators of the responsive picture specification advisable utilizing “w” to make clear it’s concerning the absolute variety of pixels within the picture file, not a difficult display screen dimension in pixels.
There may be nevertheless one other approach to retailer a listing of photos within the srcset attribute – itemizing primarily based on the pixel density issue at which photos ought to be displayed. It appears like this:
On this case, the browser will examine what this issue is for the present system (x1, x2, or x3), and primarily based on this, resolve which candidate picture to load.
This simplified format ought to be used if a given picture takes the identical dimension in CSS with all resolutions (e.g. avatars in feedback). Then the scale of the required variations relies upon solely on the bottom picture dimensions and pixel density on supported units (e.g. x2, x3).
Within the aforementioned instance, if the default URL is a 200×300 pixels picture, the following two candidates ought to be 400×600 and 600×900 pixels respectively. In srcset you don’t have to supply the bottom picture x1 – one with the src attribute is taken into account to be such. That is completely different from utilizing width descriptors (“w”) that trigger src to be fully ignored.
Shifting ahead on this article, we’ll solely use the srcset variations with width descriptors. They’re probably the most usually utilized in actual net functions, the place the sizes of photos are associated to the sizes of screens.
Sizes attribute
You will have seen that within the first code snippet, we added the sizes attribute to the picture. It’s a required record of candidates marked with width descriptors, and its activity is to inform the browser which model of the picture to load relying on the scale of the display screen.
The rationale behind this answer?
The width of the displayed photos is normally decided by CSS kinds, loaded in separate sheets. If the browser had been to decide on which picture to load solely primarily based on CSS kinds, then earlier than doing so, it will first must obtain all of the CSS and JS information to know the show dimension of every graphic on the display screen.
This strategy could be counter-productive – as an alternative of loading the picture straight away and displaying a working web page to customers as quickly as potential, the browser would await information that don’t have anything to do with the picture!
The sizes attribute is useful right here – throughout HTML rendering, it tells the browser straight away which candidate shall be greatest for a given display screen decision.
The browser all the time is aware of what the display screen dimensions are and what the pixel density issue is. It doesn’t want any further data, and it actually doesn’t have to attend for the CSS to load.
The sizes attribute makes use of the syntax recognized from media queries. We are going to put a listing of guidelines in it, separated by commas. Every rule consists of:
- a situation beneath which it’s activated,
- dimension of the picture if this rule is lively.
The exception is the final rule, which consists solely of a dimension and is robotically activated when no earlier situation has been matched!
We will take into consideration sizes as hints to the browser concerning the picture dimension on the display screen when all kinds are loaded.
In probably the most trivial case, the above sizes could end result from such CSS content material:
Nonetheless, in actual functions, the scale usually aren’t set straight and should end result out of your complete web site structure.
For instance, the content material of your web site on a desktop occupies a most of 1280 pixels, divided in a 5:1 ratio between the primary content material and the sidebar. What would be the dimension of a picture that matches 100% of the bigger block’s width? With out sizes, and all of the CSS loaded, the browser couldn’t determine it out. With sizes, the browser is aware of instantly that if solely the display screen width is larger than, say, 1280px, then the given graphic shall be displayed at 1024px lengthwise.
In fact, media queries positioned in sizes don’t boil all the way down to measuring the width of the display screen solely. You’ll be able to profit from all the chances supplied by media queries in CSS and, for instance, load the suitable picture relying on whether or not the display screen is horizontal or vertical.
Understand that as soon as the browser masses a bigger picture, it could not return to the smaller one. This may be the case when customers rotate their telephones to modify the browser from horizontal to portrait mode.

As soon as the browser is aware of the width of the picture on the display screen, it’s solely a step away from deciding on the suitable candidate from the srcset record. The browser solely must multiply the width in px with the density of pixels and thus receive the scale of the wanted graphics. If a picture with particular dimensions just isn’t accessible, the following bigger one shall be loaded.
The desk beneath exhibits what photos browsers loaded relying on the system for the earlier instance:
| Display screen width | Picture width on display screen (primarily based on sizes) | Pixel density issue | Finest picture dimension (primarily based on srcset) | Chosen file |
| 390px | 128px | 2 | 128 x 2 = 256w | image_256.webp |
| 960px | 256px | 2 | 256 x 2 = 512w | image_512.webp |
| 1920px | 1024px | 1 | 1024w | image_1024.webp |
The precise order of guidelines in sizes issues!
The foundations are verified one after the other, and the check-up of the situations ends when the primary situation met is discovered. Subsequently, in case your situations are primarily based on min-width checking (much like the mobile-first strategy in CSS), then the principles ought to be sorted from largest screens to smallest.
✅Right (min-width: 1024px) 300px, (min-width: 760px) 640px, 540px
❌Incorrect: (min-width: 760px) 640px, (min-width: 1024px) 300px, 540px
Within the appropriate instance, on an HD display screen (that are 1920px large), the rule factors out to 300px large picture (1920px > 1024px). Nonetheless, in case you use the unsuitable order, the 640px picture shall be loaded, as a result of the browser will cease checking after the primary optimistic end result (1920px > 760px) and received’t transfer to the opposite ones, even when they make extra sense.
A potential answer right here is reciprocal constraints, guaranteeing appropriate operation even in case you unintentionally combine up the order: (min-width: 1024px) 300px, ((min-width: 760px) and (max-width: 1023px)) 640px, 540px.
That’s it for the idea, time to place it into apply.
How to decide on dimensions when implementing responsive photos?
Sadly, not that simple.
Creating information for ALL potential display screen widths is simply absurd. They are often arbitrarily generated on demand when the browser asks for them however typically this isn’t technically possible. In addition to, issuing an endpoint that scales photos to any dimension will be abused by individuals with malevolent intentions. Sure, cupboard space is reasonable, however that’s overkill.
When selecting the sizes of graphics, it’s essential to comply with your breakpoints and units utilized by your customers. There is no such thing as a single answer that matches each case. Guides that merely let you know to make use of subsequent/picture with out the right parameters refinement are pointless.
So, for our instance, we’ll use a web page consisting of the next CSS and HTML code:
The displayed picture has no added sizes and srcset attributes but. I’ll present you the way to do it, step-by-step.
Begin with the biggest screens
They’re simpler to make use of due to the fixed-width structure. CSS exhibits that on screens measuring 1200px and extra in width, your div that features graphics is all the time 1200px horizontally. There are not any areas or margins, so it’s simple to infer that the area for the room within the center may also be 1200px.
It isn’t all the time really easy to calculate. In additional advanced conditions, use developer instruments and obtain the present dimension of the img component from there. See the screenshot beneath.

In Chrome DevTools, in case you hover over the picture, you will notice a tooltip just like the screenshot above with quite a lot of fascinating data:
- instrinsic dimension is the actual dimension of the at present used graphic (sizes within the file).
- rendered dimension is the scale you search for, i.e. how a lot area the picture takes up on the consumer’s display screen. On this case, the quilt div restricts the picture to 1200px horizontally, as predicted.
- rendered and intrinsic facet ratios enable checking if the proven picture just isn’t cropped or distorted and has the form we do count on.
- file dimension means that you can shortly confirm the reals dimension of the picture in kilobytes.
- a present supply informs which picture model the candidate is de facto rendered. It is going to be helpful for us quickly.
Desktops and tablets
With this data, you’ll be able to develop your img tag. Add a 1200w file to it (line 5). Additionally, handle customers with screens 144ppi or extra (e.g. Mackbook the place the pixel density ratio is 2 or extra) – it’s price including a picture with a double dimension not less than (line 4). Lastly, inform the browser that on screens with a decision from 1280px horizontally, your picture could have a rendered width of 1200px (line 8).
Your code ought to appear like this:
The same factor happens with the second breakpoint, created for tablets and telephones with bigger screens (e.g. iPhone 12 Professional Max). You’re nonetheless coping with a fixed-width structure, so that you want 800w picture width. Now you’re coming into the cell units territory – they usually have screens with a density issue of 2x and even 3x – so contemplate them when increasing the candidate photos record (1200w, 1800w).
Ultimately, you added solely two variations to the record (1x and 3x), as an alternative of three (1x, 2x, 3x), as 2x would then be 1200w large which coincides with the beforehand added entry (no sense so as to add the identical picture once more).
Verification
At this level, you might be tempted to check your code and see how the picture modifications relying on the width of the browser window. It may be performed however keep in mind some guidelines right here.
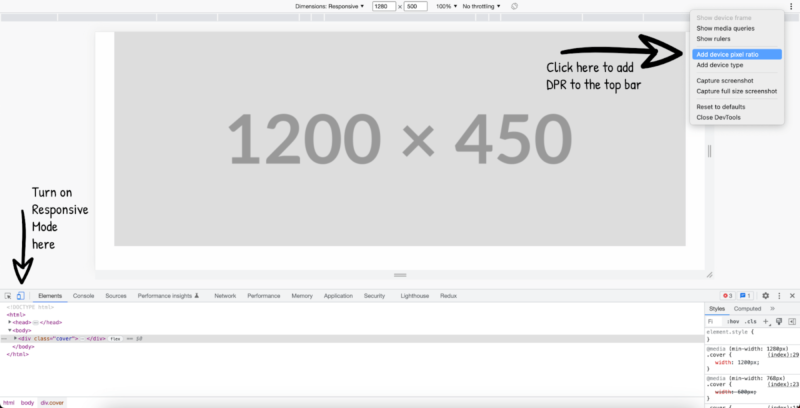
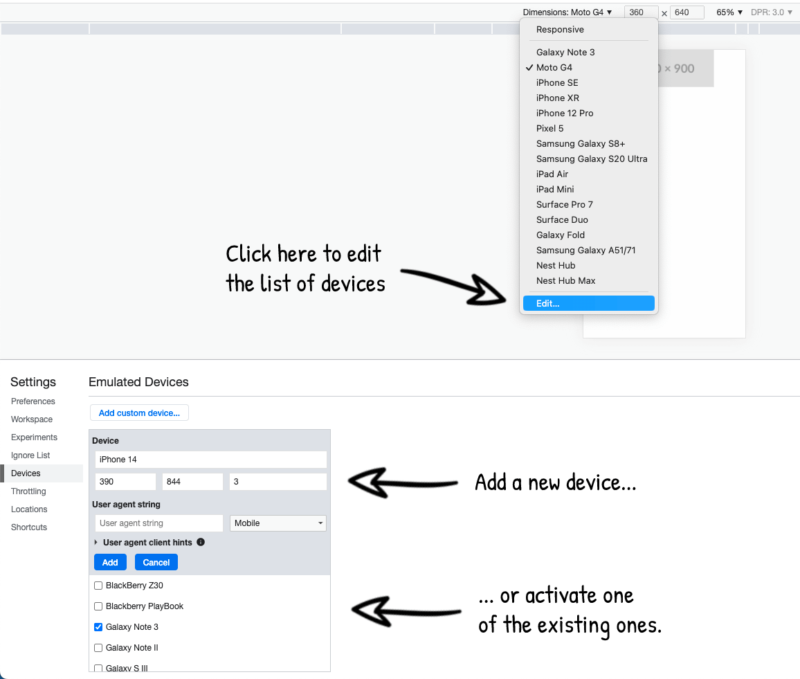
It’s greatest to begin with utilizing the Responsive Mode in Chrome DevTools – they will let you modify the pixel density issue as nicely.
After opening the developer instruments, you activate the Responsive Mode by clicking on the small icon within the higher left nook of the panel or by urgent the SHIFT + CMD / CTRL + M keys. On the prime, a bar will seem that controls the displayed decision of your app.
On the left, there’s a listing of pattern units with display screen simulators. Then textual content bins with the present view dimension, display screen zoom, and the Web slowdown standing. By default, there’s no pixel density ratio swap there, so it’s price including it by clicking the three-dot menu on the correct.
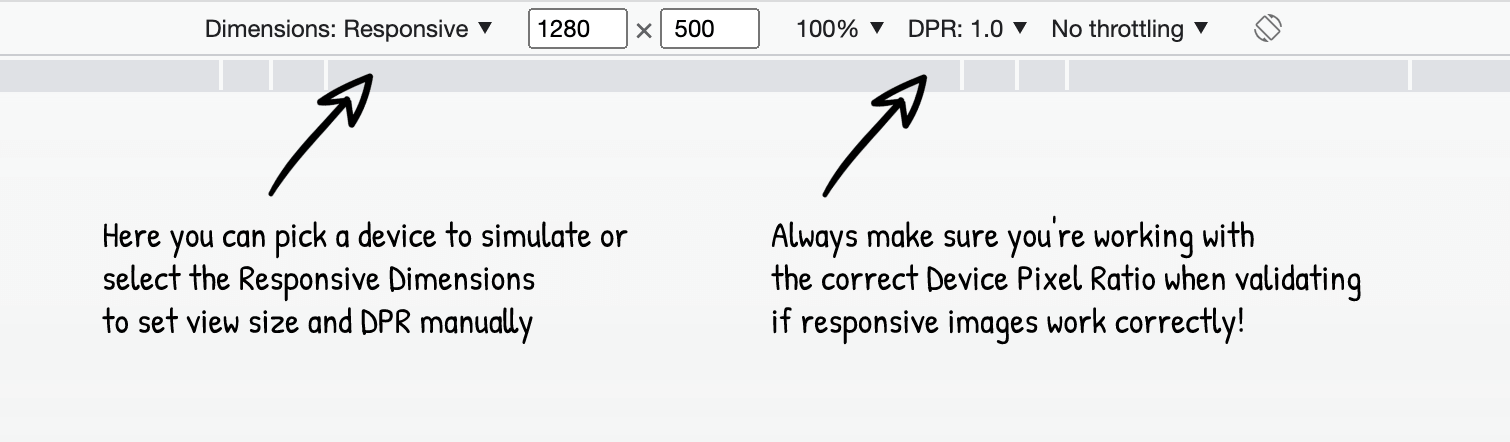
With DevTools arrange this fashion, you can begin testing responsive photos. For desktop variations, select “Dimensions: Responsive” from the record of units to conveniently change the view dimension by utilizing the handles or coming into them manually within the textual content fields.
It’s essential to work with the proper DPR, in any other case, the browser could load completely different photos than you count on. For instance, on MacBooks with responsive dimensions, the default DPR is 2. A second of inattention and your calculations would possibly find yourself unsuitable.
For this text, I examined all 5 picture show variants that we’ve added to this point. Two for the very best breakpoint (x1, x2) and three for the typical (x1, x2, x3). Every thing labored as deliberate! Within the additional half, I’ll hyperlink the completed code so that you can check your self.
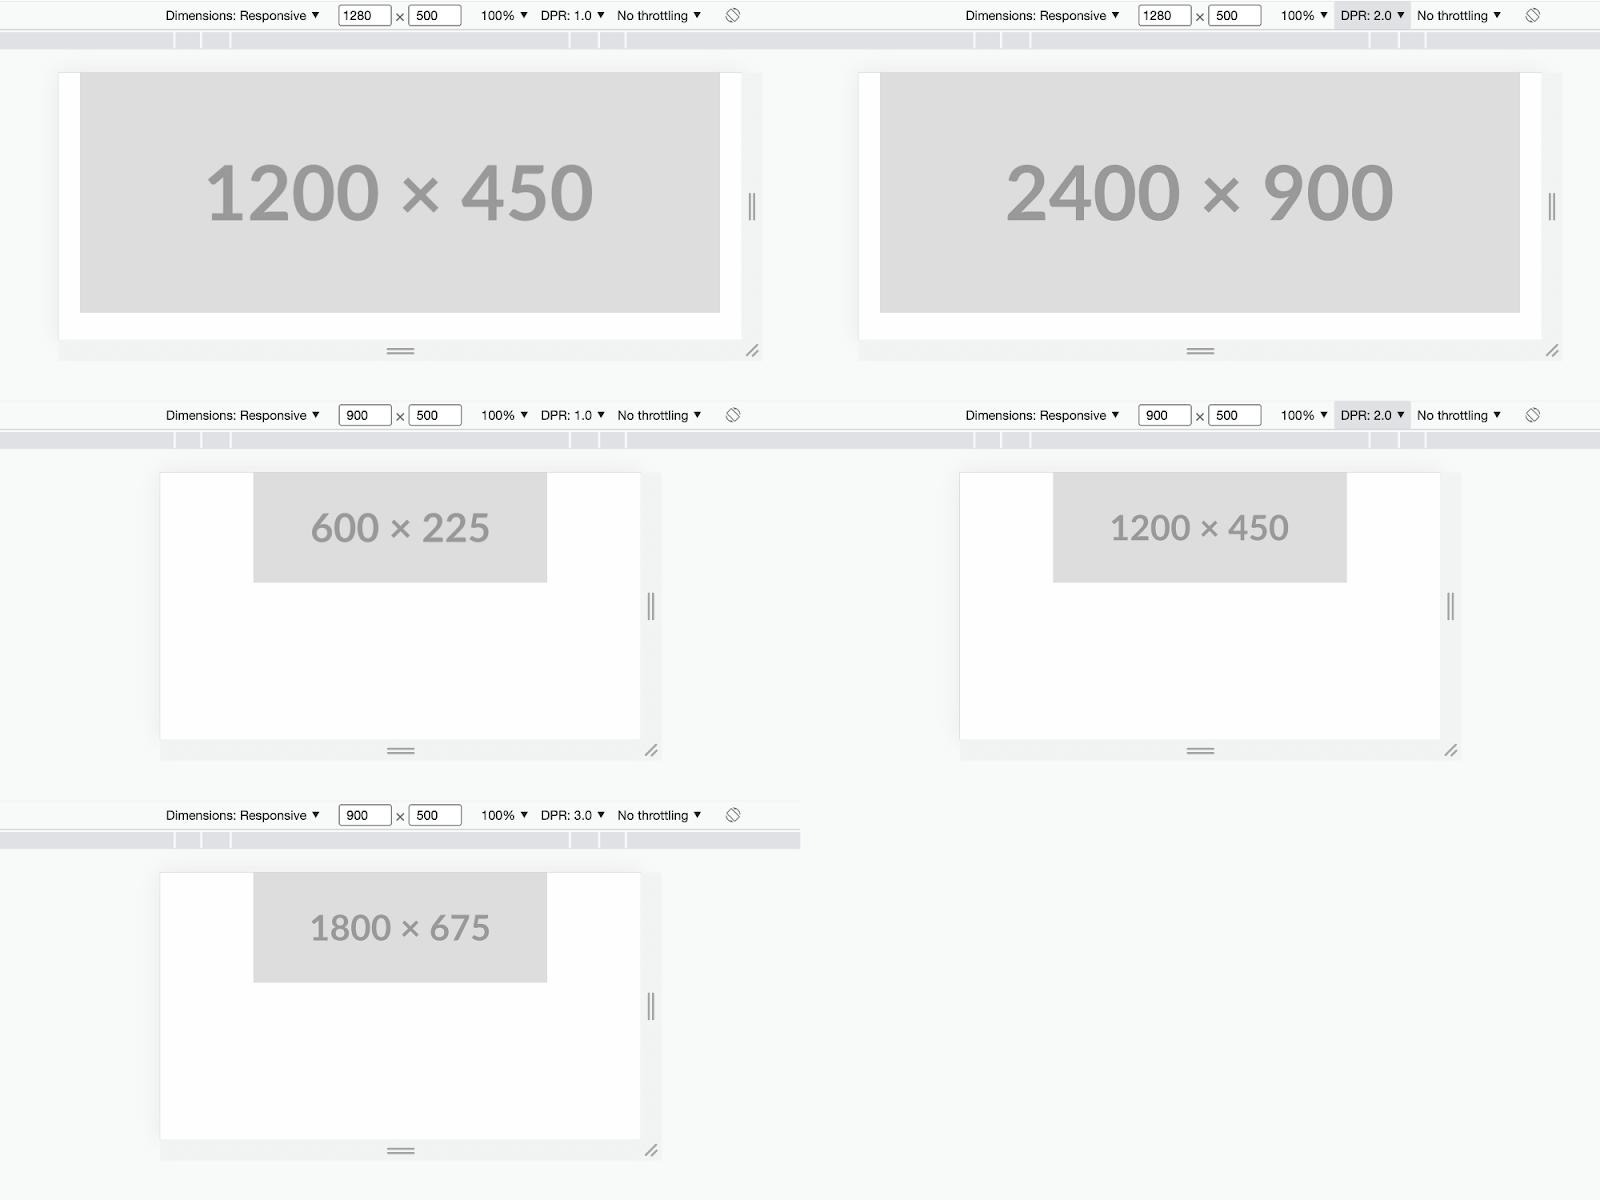
For testing, I used Placehold.co – for URLs with inserted sizes, the software returns a picture with a given decision displaying sizes as textual content. It’s handy to shortly see what’s the scale of the graphics being rendered. For precise pictures, there are two different methods to examine which picture has been chosen:
- I confirmed you the primary one earlier. It’s that small window that exhibits up if you hover your cursor over a component in DevTools.
- One other methodology is to click on on a component in DevTools, after which transfer to the console. This click on made the picture reference accessible within the console beneath the $0 variable. Now you need to use it to examine the worth of the currentSrc area. If any photos are uploaded, this area will comprise the URL to the chosen objects.

Throughout testing, it could occur that one thing simply appears… unsuitable. Earlier than you begin nervously altering your HTML code, examine in case you got here throughout one of many browser optimizations:
- In case you loaded a bigger picture after which decreased the view dimension, it could occur that the browser received’t load the smaller graphic and can proceed to return the upper decision.
- Even in case you reload the web page, a bigger picture from the browser cache should be displayed. Disable this mechanism in DevTools (Community > Disable cache).
- Simply to make certain, refresh the web page each time after you activate the Responsive Mode in DevTools, change the simulated system, or manually modify the view dimension or DPR – this fashion you received’t run into false positives.
Cursed cell units
Now it will get fascinating – units with small screens! Right here your structure has a variable width and the picture takes the scale of the system. As I discussed earlier than, it’s not troublesome to have a separate picture for each potential dimension, from 1 pixel up. The artwork is to resolve on particular dimensions and discover standards to decide on them greatest.
One of the best answer is to examine what units your customers actually personal!
The simplest approach to discover out about your customers’ units is to analysis data on the most well-liked smartphones in your goal group. You’ll be able to seek for units per nation, age, and so on. So in case your app goes for use by kids from the USA, it is best to undoubtedly look into screens of low-end units. In case you purpose at teenage influencers, then you’ll most likely give attention to Apple merchandise.
In case your web site is stay for a while, and also you need to optimize it, it’s price utilizing the statistics you might have already collected (and you’ve got, proper?). Google Analytics offers reviews about applied sciences and technology-related particulars with a breakdown of Machine Fashions. For a fair higher view, filter the “solely cell and pill units” class.
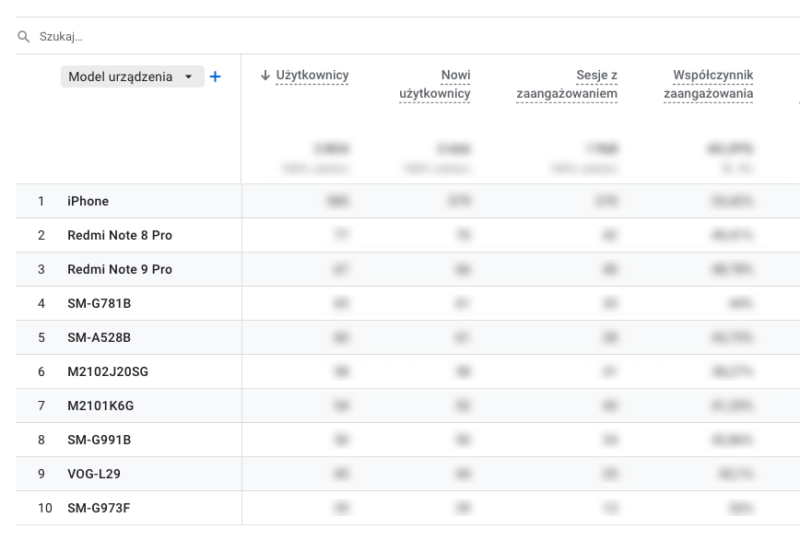
It’s mainly a listing of units that the majority usually go to your web site. A few of them could look unusual – it’s the producer’s code, not the advertising and marketing title. You’ll be able to decode such a reputation by typing it in Google and punctiliously evaluating it with official web sites/shops that usually will record these codes.
No matter what units you finally add to your record, it’s essential to not neglect about a very powerful of them – Motorola Moto G Energy. That’s proper, instruments like Lighthouse or PageSpeed Insights all the time check cell apps primarily based on this telephone’s display screen. Google, the creator of these testing instruments, used to personal Motorola, in order that explains why this specific system was chosen. So if you wish to optimize your app efficiently, don’t neglect concerning the teeny tiny display screen of this common Motorola.
Within the splendid scenario, it is best to attempt to show good-quality photos on as many smartphones as potential. In apply, about 5 hottest units are chosen.
A whole lot of units of the identical collection share browser view widths, so it is sensible. There’s no excellent quantity right here, the whole lot will depend on your customers and technical capabilities. The extra sizes you assist, the extra advanced the code turns into (extra to keep up). So analyze which units it is best to assist with completely fitted photos, and which might get a bigger format for self-scaling.
Let’s say you selected to prioritize three cell units: iPhone 14, Xiaomi Redmi Observe 8 Professional, and naturally, Motorola Moto G Energy. Now, simulate these units within the browser to examine the rendered dimension of your photos. On this case, the picture has no padding and margins, the telephone display screen width equals the picture width. In actual apps, nevertheless, this may be rather more advanced.
How have you learnt how massive are browser views and DPR on these units? Some are predefined in DevTools however you received’t discover all telephones there (particularly the brand-new ones). So the remainder of the information it’s important to work out your self.
The simplest approach to do it’s to Google the system title for technical specs. Your browser’s decision could also be referred to as “logic decision” or “viewport dimension”, and DPR – “ratio” or “scale issue”. I extremely suggest the Sure Viz web site.
By way of this web site, you’ll set up the next information:
- iPhone 14 – 390 x 844, DPR: 3
- Xiaomi Redmi Observe 8 Professional – 393 x 851, DPR: 2.75
- Motorola Moto G Energy – 412 x 823, DPR: 1.75
It’s price including them on the record of predefined units in Responsive Mode in DevTools (received’t must enter them manually each time). It’s easy, simply take a look at the screenshot beneath:
The following steps received’t be a lot completely different from what you probably did with desktops and tablets. You show your app in a view with the correct dimension (by coming into it manually or by simulating a particular system), obtain the scale of the rendered picture, and considering the system DPR, add it to the graphics HTML code.
Be cautious when writing media queries for the sizes attribute. One of the best ways is to begin from the underside, from the smallest system, and outline how the picture renders there straight (390px). Then go to the following smallest system and write the media question, so the picture for this system is proven from that system’s display screen dimension (393px) as much as the following one ((min-width: 393px) 393px). Repeat it for all of the remaining telephones and tablets and this fashion, you’ll serve the very best graphics not just for the units you assist but in addition for these, you don’t cowl straight.
It is going to be simpler to grasp with information in a desk.
| Machine | Display screen width | Picture width | DPR | Graphics width | Media Question |
| Motorola Moto G Energy | 412px | 412px | 1.75 | 412 x 1.75 = 721w | (min-width: 412px) 412px |
| Xiaomi Redmi Observe 8 Professional | 393px | 851px | 2.75 | 393 * 2.75 = 1081w | (min-width: 393px) 393px |
| iPhone 14 | 390px | 390px | 3 | 390 x 3 = 1170w | 390px |
Translating this into code language and including to the picture you created earlier, and also you get the ultimate model of your picture:
Up to now we have now utilized all of the responsive photos guidelines fairly exactly. However in case you’re more adept, and also you solely need to tweak ends in Lighthouse or PageSpeed Insights (primarily based on Lighthouse working in a managed setting), you’ll be able to strive some shortcuts. Extra about them later.
Lighthouse rating success guidelines from my colleague:
Larger image
Some readers could also be upset with this code – graphics addresses for various display screen widths are combined with one another and are usually not in any apparent approach associated to the media queries for which they’re to be displayed. This makes sustaining code troublesome, costly, and presumably problematic for builders who will take over the applying after you sooner or later.
There’s an alternate – tag image in HTML. Much less common, however simply as highly effective.
To display the way it works, I rewrote the earlier code into an image tag:
Tag image has no particular attributes, the whole lot vital occurs inside it. Put the img tag in it – that shall be your default picture (for options not supporting tag image), and one (or extra) supply parts. Every supply corresponds to at least one breakpoint. Enter optionally available media question within the supply media attribute, and the pictures assigned to it within the srcset attribute. Now, record comma-separated candidates consisting of a file path and a dimension descriptor (in a “w” unit, or as pixel density issue, e.g. 2x).
To pick a picture, the browser searches for the primary supply component that has the media question met (or has no in any respect), after which, primarily based on the DRP issue, it finds the very best candidate sources within the srcset.
Tag image or srcset & sizes. Which answer is healthier to make use of?
Each carry out the identical activity, so it actually will depend on you.
The tag image is much less common however undoubtedly extra readable and simpler to keep up.
Srcset & sizes in img strategies are utilized by all options constructed into frameworks. Producing attribute values by an automatic script is quicker to implement than creating many particular person supply parts.
My recommendation? In case you’re not a bot, use a tag image. However in case you like supply units, that’s tremendous too.
Nook-cutting & problem-solving
Lighthouse creators are conscious of telephone mannequin selection with completely different display screen sizes and pixel density components. There’s no level in making a thousand photos, so to shorten the seemingly lengthy record above, take a look at the Lighthouse supply code, and simplifications you’ll be able to afford.
Searching the file with the logic for auditing picture sizes, you’ll discover that when Lighthouse checks in case your graphics don’t weigh greater than they need to it assumes some margin of error. Curiously, this error margin is bigger in case you use srcset or the img tag. For a naked picture it’s solely 4kB. In case you made an effort to optimize, it will increase to 12kB. The sheer variety of redundant bytes is decided primarily based on the picture’s pixel ratio, and what number of pixels an ideal picture must render.
Conclusion? Don’t fear in case your graphics are just a few pixels increased or wider than their area within the web page view. Rounding in dimension scaling received’t be an issue. 12kB is 8 rows with a width of 512 pixels every (assuming the RGB format and simplifications).
Additional, in the identical logic file, you’ll be taught that this audit fully excludes sure sorts of information from being examined:
- SVG vector graphics. On account of their nature and the opportunity of free scaling, there’s no have to create their variations for various display screen widths. SVG ought to be used every time potential anyway – takes up little area, and will be freely decreased and enlarged. Good for icons and geometrical shapes. When used appropriately, with SVGs you’ll be able to keep away from coping with responsive graphics.
- CSS-attached photos. Backgrounds, or clipping masks. As a result of multitude of the way by which CSS graphics can be utilized, verifying correctness could be too difficult and burdened with errors.
Use audit exclusions if you end up unable to completely match the scale of the picture to the view area.
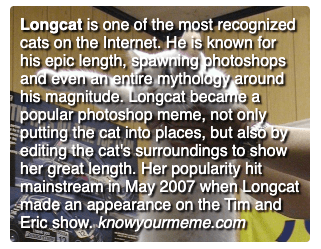
I’ve received a Lengthy Cat instance right here. This can be a div with peak relying on the user-entered textual content size. You might be tempted to show the background picture utilizing the img tag and place it with place:absolute to be detected by search engine crawlers. However then you definately’ll uncover there’s no easy approach to decide the mandatory peak of the picture – because the content material is variable, the peak of the background picture can be variable.
The workaround for that is to show the picture in its entirety, merely utilizing the background-image CSS attribute. Simply keep in mind to not make the image too massive. You received’t crop it, and also you don’t need to present the HD model if the div is small. Sure, it’ll now not be seen to engines like google, which is unhealthy for basic search engine marketing and accessibility, however not less than your web site received’t undergo in PageSpeed Insights exams. Nonetheless, attempt to keep away from this answer in any respect prices and contemplate cropping the textual content or utilizing a distinct design strategy. Particularly if the picture is vital, and it could be essential for individuals utilizing display screen readers to entry the picture’s different textual content.
Different exceptions in Lighthouse’s code
If the picture is displayed at a dimension of zero by zero pixels, the audit received’t punish your web site so long as the picture file just isn’t wider than two display screen widths. You received’t lose factors for too massive a picture if the identical file can be displayed elsewhere on the web page and suits there the area it occupies.
One thing fascinating additionally occurs within the audit checking whether or not the pictures in your software are usually not too small. Its creators discovered that there’s no sense to assist a DPR worth as excessive as 3 as a result of whether or not we show a double or triple-detailed picture is indistinguishable to the human eye.
On this audit, DPR is “rounded” all the way down to 2, 1.5, and 1. In apply, this implies you could typically afford the applying to show graphics with a decrease decision than the system is de facto in a position to show. For instance – if the DPR is 3, the check checks your software as if it had been 2, and thus will enable fewer weighting photos. This additionally helps with dealing with units having unique DPR values like 2.652 as a result of you’ll be able to merely deal with them as e.g.: 2.
Remaining tip! At all times take note a very powerful factor – your web site mustn’t solely rating nicely in Lighthouse however have nice efficiency in your customers’ units. “When a measure turns into a goal, it ceases to be measure”.
All shortcuts supplied on this article are helpful however aren’t excuses to cheat and worsen the consumer expertise. Your final aim is a working answer with fantastically introduced photos.
Responsive photos. Abstract
I hope that after studying this textual content you’re armed with all of the theoretical and sensible data about responsive graphics. The data about responsive graphics is broadly dispersed on the Web, so I wished to gather it and put together you for this journey so that you simply don’t must pave the path that many earlier than you might have traveled with issue.
Lastly, I’d prefer to drop a hyperlink to Cloudflare Picture Resizing (sadly, paid service) for producing photos on demand, in any dimension, with out storing them in your server.
I congratulate you in your studying perseverance and want you a lot profitable picture optimizations! In case you see something fascinating, have questions, or discover one thing to enhance, please give me a shout via Twitter, and I’ll attempt to assist with any issues.
We are going to repair your issues with efficiency
The Software program Home groups have impeccable expertise with responsive photos. Each web-facing software we create and publicly launch is personalized and difficult as nails. Inform us about your points and we’ll come again to you with 1-h tech consultations freed from cost.


![How To Maximize Video Content Engagement on LinkedIn [Infographic]](https://newselfnewlife.com/wp-content/uploads/2025/09/Z3M6Ly9kaXZlc2l0ZS1zdG9yYWdlL2RpdmVpbWFnZS9saW5rZWRpbl92aWRlb190aXBzX2luZm8yLnBuZw.webp-120x86.webp)


