


How would you create a React app? In all probability you’ll open your favourite IDE, choose libraries, and implement all the pieces manually. What if I informed you, there’s one other approach? You possibly can generate a virtually entire app from a Figma file and join it with information. I current to you AWS Amplify Studio.
Let’s begin with the fundamentals. What’s AWS Amplify?
AWS Amplify is a set of purpose-built instruments and options that lets frontend internet and cell builders shortly and simply construct full-stack purposes on Amazon Net Companies. You don’t want years of expertise in software program growth to make use of AWS Amplify, because it means that you can create a full-stack app with fewer assets and data than organizing all companies individually by hand. It’s primarily focused at frontend and cell builders, who wish to create a secure backend for his or her apps.

The desk beneath presents options with corresponding AWS companies that you could be use in your utility.
| Amplify characteristic | AWS companies |
| Authentication | Amazon Cognito |
| DataStore | AWS AppSync |
| Analytics | Amazon Pinpoint and Amazon Kinesis |
| API | AWS AppSync and Amazon API Gateway |
| Capabilities | AWS Lambda |
| Geo | Amazon Location Service |
| Interactions | Amazon Lex |
| Predictions | Amazon Sagemaker |
| PubSub | AWS IoT companies |
| Push notifications | Amazon Pinpoint |
| Storage | Amazon S3 |
However that’s not over! Furthermore, you will have entry to:
- Amplify libraries for JS, iOS, Android, Flutter,
- Amplify UI Elements,
- Amplify CLI toolchain,
- Amplify Internet hosting,
- and AWS Amplify Studio.
I wish to deal with the latter in additional element.
What’s AWS Amplify Studio?
AWS Amplify Studio is a visible interface for modeling information, including authorization, managing customers, and many others. Nonetheless, by the tip of 2021, a brand new, revolutionary characteristic was added. Now you’ll be able to create React code from Figma parts, how cool is that? First, you create parts in Figma, then join them with AWS information and eventually generate ready-to-use React code.
You most likely marvel, “how a lot will this pleasure value me?” Shock, shock – AWS Amplify Studio itself is free, so you aren’t paying for producing parts in AWS or exporting them to React code. But it surely doesn’t imply that the entire AWS service is free to make use of since there are charges for underlying databases, cupboard space, internet hosting (and different AWS cloud companies), and many others.
When ought to I exploit AWS Amplify Studio?
I’ll begin with when NOT to make use of Amplify Studio. I wouldn’t use AWS Amplify in massive initiatives as the primary expertise, ever! In a big, advanced challenge with a lot of builders, AWS Amplify will likely be restrictive and decelerate the entire course of.
However fortunately you may make progressive modifications between MVP and the total app – you gained’t have to put in writing the entire app from the start.
So, when is that this answer advisable to make use of?
- For fast POC/MVP, when you should ship a working answer to a enterprise downside, and the standard of the code doesn’t matter that a lot.
- While you create one thing momentary, e.g touchdown web page/app for some one-time occasion.
- For including a widget/small element that isn’t a key ingredient of the app once you’re in a rush.
- For easy CRUD purposes.
- For dashboard apps.
AWS Amplify is the right alternative within the early levels of a challenge when you should ship MVP/POC for a consumer and also you don’t have a giant crew or funds. AWS Amplify delivers a set of ready-to-use parts that you would be able to modify one after the other, so when your challenge grows you may make progressive modifications. No want to put in writing all the pieces from scratch.
Easy methods to create a React app with AWS Amplify Studio?
To generate code with Amplify Studio it’s important to observe three steps:
- Figma,
- AWS,
- and React.
Every step focuses on totally different parts, so beneath I’ve ready a simple tutorial on learn how to full them as seamlessly as potential.
Step 1. – Figma
Figma is likely one of the hottest software program that primarily helps in creating designs for internet purposes however you can even use Figma as file storage, or as a collaborative instrument throughout partaking on-line conferences.
To create parts for AWS Amplify Studio it’s important to begin with AWS Amplify UI Equipment. Inside you’ll find a specifically ready file with primitives – parts to create React code.
I extremely advocate studying the ReadMe file inside AWS Amplify UI Equipment fastidiously as a result of it’s invaluable instruction on learn how to create parts.
If in case you have your Figma prepared, deal with two issues:
Format
For me, this was the toughest a part of creating parts as I’ve by no means finished something in Figma earlier than. However I used to be positively shocked that the instrument itself could be very user-friendly. After learning the aforementioned ReadMe file I created parts utilizing the auto-layout characteristic very quickly.
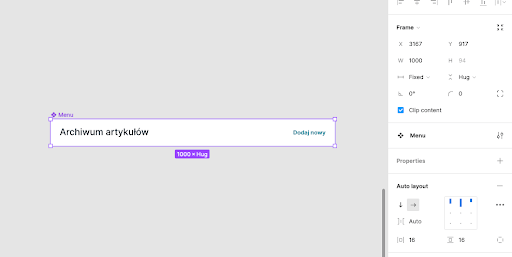
Tip: you’ll be able to set the width of a element to arrange all content material, and later change the hardcoded width to 100% in AWS. You need to use it e.g. to create a high bar menu.
Naming
I do know, naming sucks. It’s positively one of many hardest issues in programming. Additionally in Figma, it is extremely vital the way you title your parts as a result of AWS makes use of the chosen title to generate a React element.
My tip: use camelCase title to keep away from issues with producing parts (in case your element title incorporates areas AWS will take away them and be a part of the string).
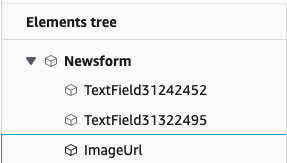
One other downside is altering the title of primitives. Think about you will have a type with 4 inputs. You add these 4 inputs from the primitive’s library as TextInput. In Figma, all primitives can have the title TextInput. However after you import them to AWS you will note e.g. TextField31322495. It’s actually arduous to search out the precise enter when including motion.
Easy methods to create good naming that gained’t trigger issues with AWS and React code?
- use PacalCase in parts names, e.g ArticleItem (as an alternative of: articleitem),
- don’t use areas in title e.g NewsForm (as an alternative of: Information Type),
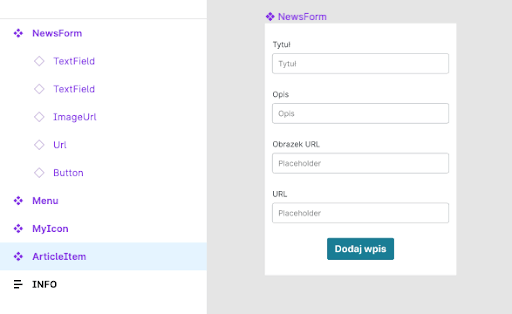
- rename inserted primitives to match enterprise names, e.g within the picture beneath you’ll be able to see a type with two parts TextFields (unhealthy) and two renamed ImageUrl & Url (Good).
Step 2. – AWS
Okay, after getting the parts, you’re able to import them to AWS the place you may make three actions:
- import a element from Figma to create React element,
- join a element with information,
- create collections from parts.
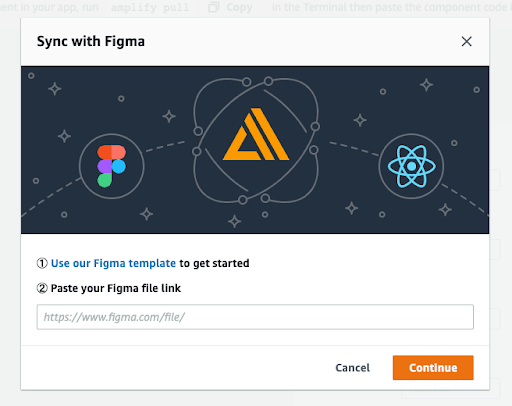
Firstly, it’s important to present a hyperlink to your Figma file similar to you see within the picture beneath.
Then wait a bit till AWS course of your parts. When it’s finished and also you see a display much like the one beneath, you’re able to overview your parts and determine which one you wish to import.
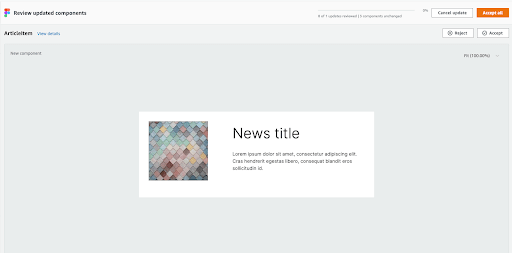
Watch out when importing parts! When you see any UI issues throughout this step it means issues will pop up throughout later levels too. When this occurs, there’s just one factor to do – you should return to Figma and repair the element.
After you import all of your parts you’ll be able to verify and configure them within the AWS Amplify subpage.
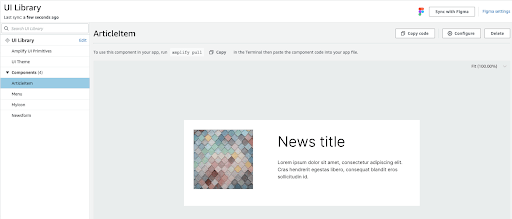
What’s extra, you’ll be able to configure CSS properties of parts (e.g: override the width or peak set in Figma), add further props to your parts (which can be utilized later in code), or connect information from AWS.
Within the gif beneath you’ll be able to see ready information for my app and the way I’m capable of place information within the element.

While you join information with a element you will note random information from the database within the element. When you want a pleasant place to verify whether or not your element is well-prepared, right here it’s. What it is best to verify throughout this step?
- how photos are displayed,
- textual content and content material visibility,
- do parts develop when information is longer,
- different visible drawbacks.
HTML occasions (like onClick, onMouseOver, onMouseLeave, and many others.) are dealt with from AWS. You possibly can assign totally different handlers to those actions. As of writing, the next actions had been out there:
- signal out,
- open URL,
- open URL within the new tab,
- scroll to anchor,
- refresh,
- modify ingredient property (e.g. backgroundColor),
- create, replace and delete information from the shop.
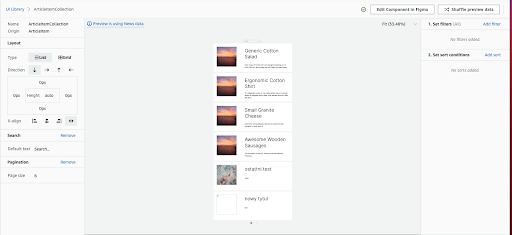
The subsequent step is optionally available – you may make an inventory element from the merchandise you created. You possibly can select between an inventory or grid (excellent for some e-commerce websites) and the info is fetched from AWS Amplify Datastore. Within the image beneath you’ll be able to see how one can customise the record to your wants: you’ll be able to edit some UI parts, add a search engine, and pagination. You may also filter and type the info you wish to show.
Step 3. – React code
With a view to put together your code to fetch parts from AWS Amplify, it’s important to:
- initialize the challenge,
- configure routing,
- arrange AWS Amplify within the challenge.
I gained’t develop on the primary two factors as it’s described in Create React App and React Router documentation however I’ll inform you extra concerning the AWS Amplify setup. First, you maintain the entry to your AWS account. Try learn how to configure CLI on AWS.
Subsequent, set up AWS Amplify CLI as a worldwide bundle.
With a view to use Amplify CLI, kind the command beneath in your challenge (on the highest degree):
You could find `app-id` and `env-name` within the Amplify console.
When you kind this command for the primary time, you should reply a few questions:
- favourite editor,
- the kind of app (select Javascript),
- Javascript framework (select React),
- supply listing path (the default is src and you may go away it like this),
- distribution listing path (the default is construct and you may go away it too),
- construct command,
- begin command,
- do you propose to change backend? (you’ll be able to select “No” for those who don’t wish to change backend from code).
After that, you will note new parts in src listing:
- /fashions – database fashions,
- /ui-components – generated parts,
- aws-exports.js – AWS config file (you’ll want this in a second).
Easy methods to configure Amplify UI?
Exported AWS parts use the `@aws-amplify/ui-react` library to show parts. So step one is to arrange this UI library.
Subsequent, within the root file (index.tsx or related) or predominant element (app or related), import primary kinds and supplier.
Aside from that, configure Amplify library and set up it with the command:
…and within the index file add these strains:
Aaand that’s it! Your challenge is able to import parts from AWS. When you make any modifications, import up to date parts utilizing `amplify pull`.
Generated parts
Your parts will likely be within the `ui-components` listing, as AWS generates *.jsx parts. Fortunately, additionally, you will discover varieties there so utilizing them in a Typescript challenge gained’t trigger any issues.
Three issues it is best to learn about generated parts:
- Every element helps `overrides` props for customizing `@aws-amplify/ui-react` parts. It’s merely a key-value map the place keys are element names and worth is props object. The simplest method to verify the element title is to verify the code.
- Within the assortment (record/grid) element you’ll be able to present your information. When you cross parts in `gadgets` props they are going to be used. If this prop is empty, the element makes a request to fetch gadgets from a database.
- AWS doesn’t delete parts after a reputation change. When you change the element’s title and pull new parts, within the listing you will note the previous element with the previous title and the brand new one. It’s a must to take away it manually to keep away from a large number within the code.
Advantages of AWS Amplify Studio
- deeply built-in with different AWS companies,
- you don’t want a lot of data about AWS companies to work with Amplify Studio,
- it means that you can shortly create an app (from designs to working app in hours, not days or even weeks),
- can create each a full app and a single widget,
- after being generated, every element is customizable,
- configuring backend in minutes,
- connecting UI parts to your backend with only a few clicks,
- you’ll be able to shortly take a look at what you are promoting thought earlier than hiring a big crew,
- it can save you time & cash on unhealthy concepts.
AWS Amplify tutorial. Closing ideas
If in case you have entry to Amazon Net Companies, add Amplify Studio characteristic. I extremely advocate checking this characteristic out, it could be simply the factor you want in your subsequent challenge.
So let’s sum up an important takeaways from this AWS Amplify Studio tutorial:
- Bear in mind to make use of AWS Amplify UI Equipment,
- Add descriptive names to your parts,
- Verify parts’ UI through the import to AWS,
- Customise parts, and add occasion handlers in AWS,
- Create an inventory/grid from parts,
- Put together React challenge and pull parts from Amplify,
- Override some element props however for bigger modifications, it’s important to undergo the entire course of,
- Keep in mind that AWS generates *.jsx parts,
- Every element has a file with varieties,
- AWS doesn’t delete parts after a reputation change.
Good luck!

JavaScript developer with three years of expertise. Massive fan of strongly typed languages that’s why he makes use of Typescript every time he can. Olek likes to be taught new frameworks, languages and options. In his free time, he reads fantasy books (Terry Pratchett’s “Discworld” FTW!), does sports activities and performs laptop video games. Hearthstone, anybody?


![The Most Visited Websites in the World [Infographic]](https://newselfnewlife.com/wp-content/uploads/2025/05/Z3M6Ly9kaXZlc2l0ZS1zdG9yYWdlL2RpdmVpbWFnZS9tb3N0X3Zpc2l0ZWRfd2Vic2l0ZXMyLnBuZw.webp-120x86.webp)


